This tutorial will show you how you can set up a simple blog using a static site generator that is very fast and easy to use.
What Is An SSG?
SSG, or Static Site Generator, is a web application that converts the dynamic content on a webpage into static content usually stored locally. Static site generators do not require databases and backends, thereby eliminating the need to learn how to code. It mainly focuses on writing and presenting the content.
SSG vs. CMS
The most popular way to create websites and manage content is using CMS or Content management systems such as WordPress, Drupal, Joomla, etc.
CMS systems work by creating and managing content directly using an interactive interface. Since data in a CMS is retrieved from the database, CMSs are very slow as the content is fetched and served as dynamic content. CMS systems are also prone to security vulnerabilities as they rely on external plugins written by other developers to increase functionality.
On the other hand, static site generators work by creating content offline mediums such as text editors and renders the final page view upon publication. Since the content is locally-rendered, with no need for a database, the page renders faster, and load speeds are incredibly fast.
Static site generators are made of pre-compiled code that acts as an engine to render the published content.
How to Build a Static Blog With Hexo
One of the popular choices for building a static site is Hexo.
Hexo is a simple, fast, and powerful SSG application written in NodeJS. Although there are other choices for building a static site, Hexo allows you to customize your site and integrate various tools.
Let us look at how we can set up a simple static site with Hexo.
Installing Hexo
Before we can build a site, we need to set up hexo requirements and install it. For this, we require NodeJS and git.
Start by updating your system:
sudo apt-get upgrade
Once you have your system up to date, install git
Next, install nodejs from nodesource using the command:
apt-get install -y nodejs
Once you have Nodejs installed, we can proceed to install hexo using the command:
Working with Hexo
Once you have installed hexo, you can create a site and publish content. Let us look at how to work with Hexo. Keep in mind that this is a quick, simple guide. Refer to the documentation to learn more.
Creating a site
To create a new hexo site, use the command below:
cd HexoSite
npm install
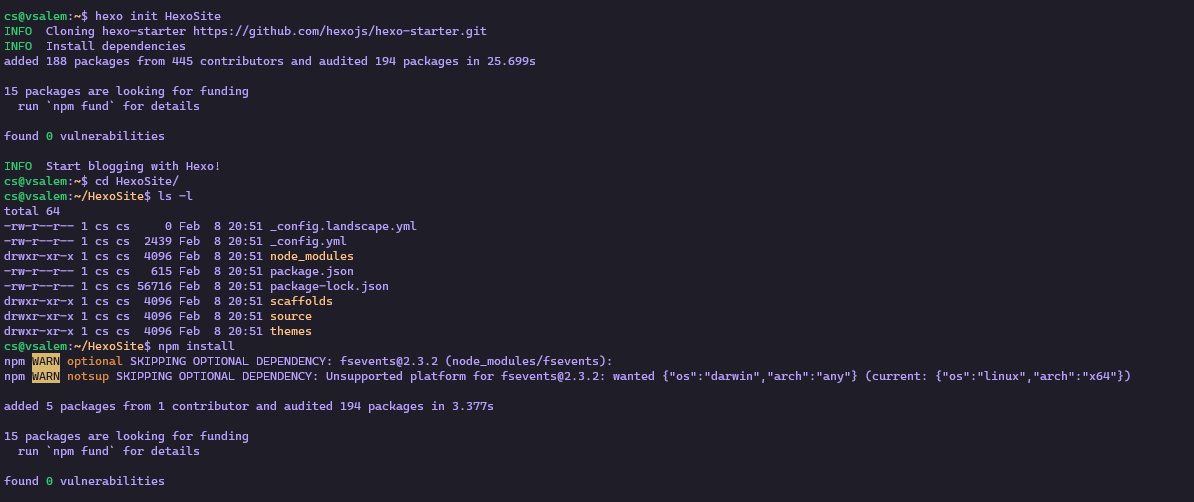
Understanding Hexo Directory structure
Once you initialize a new Hexo site, you will get a directory structure such as the one below:
-rw-r--r-- 1 cs cs 2439 Feb 8 20:51 _config.yml drwxr-xr-x 1 cs cs 4096 Feb 8 20:51 node_modules
-rw-r--r-- 1 cs cs 615 Feb 8 20:51 package.json
-rw-r--r-- 1 cs cs 56716 Feb 8 20:51 package-lock.json drwxr-xr-x 1 cs cs 4096 Feb 8 20:51 scaffolds drwxr-xr-x 1 cs cs 4096 Feb 8 20:51 source drwxr-xr-x 1 cs cs 4096 Feb 8 20:51 themes
The first file is the _config.yml contains all the settings for your site. Ensure to modify it before deploying your site because it will contain default values.
The next file is the package.json file that contains the NodeJS application data and configurations. Here, you will find installed packages and their versions.
You can learn more about the package.json from the resource page below:
https://docs.npmjs.com/cli/v6/configuring-npm/package-json
Creating a Blog
To create a simple blog in hexo, use the command:
Once created, you can file the markdown file under /source/_posts directory. You will need to use Markdown markup language to write content.
Creating a new page
Creating a page in Hexo is simple; use the command:
The page source is located under /source/Page-2/index.md
Generating and Serving content
Once you publish your content on hexo, you will need to run the application to generate the static content.
Use the commands below:
INFO Validating config
INFO Start processing
INFO Files loaded in 966 ms
INFO Generated: archives/index.html
INFO Generated: Page-2/index.html
INFO Generated: archives/2021/index.html
INFO Generated: index.html
INFO Generated: archives/2021/02/index.html
INFO Generated: js/script.js
INFO Generated: fancybox/jquery.fancybox.min.css
INFO Generated: 2021/02/08/Hello-World-Post/index.html
INFO Generated: css/style.css
INFO Generated: 2021/02/08/hello-world/index.html
INFO Generated: css/fonts/FontAwesome.otf
INFO Generated: css/fonts/fontawesome-webfont.woff
INFO Generated: css/fonts/fontawesome-webfont.eot
INFO Generated: fancybox/jquery.fancybox.min.js
INFO Generated: css/fonts/fontawesome-webfont.woff2
INFO Generated: js/jquery-3.4.1.min.js
INFO Generated: css/fonts/fontawesome-webfont.ttf
INFO Generated: css/images/banner.jpg
INFO Generated: css/fonts/fontawesome-webfont.svg
INFO 19 files generated in 2.08 s
To serve the application, run the command:
Conclusion
This quick and simple introduction has shown you how to use the Hexo static site. If you need more information on how to work with Hexo, please refer to the main documentation provided below: