This additional information contains the following four entities:
- SELinux User: Defines the identity of the user who accesses, owns, modifies, or deletes a process or file in Linux-based operating systems. If a user has access to any particular file or process in Linux, then the user’s identity is explicitly mentioned in the SELinux security policy. This means that a Linux user is always referred to by his or her identity.
- Role: Based on this entity, a user is allowed or denied access to a certain object in SELinux. The concept of a role is derived from one of the very famous access control models, i.e., Role-Based Access Control (RBAC). This model is particularly useful when a lot of users share the same access rights. Instead of associating each individual user with specific access rights, the access rights are associated with a particular role. The access rights associated with the particular role of a user are automatically assigned to that user.
- Type: This entity is used to define types of files and domains of processes in SELinux. By using this entity, access is granted if and only if a rule in the access control policy of SELinux is present for that particular type, and also the rule is there for granting access and not vice versa.
- Level: This entity represents Multi-Level Security (MLS) and Multi-Category Security (MCS). The security levels are defined by terms such as high, low, etc.
In short, an SELinux context is a combination of these four attributes. With the help of these four attributes, SELinux grants or denies file or process access to a user.
This article shows you methods for listing all the SELinux contexts in CentOS 8.
Methods for Listing SELinux Contexts in CentOS 8
To list all the SELinux contexts in CentOS 8, you can pick any of the four methods shared below:
Method # 1: Using the “semanage” Command
To list the SELinux contexts for all the files and processes in your CentOS 8 system, run the following command in your CentOS 8 terminal:
This command cannot run without root user privileges. It is mandatory to use the “sudo” keyword with this command; otherwise, it will render an error message. So, it is better to use this command in the same way stated above to save you precious time.
![]()
Once this command has completed its execution, all the SELinux contexts will be displayed in your terminal, as shown in the image below. You can scroll up, down, left, or right to have a complete view of all the SELinux contexts in CentOS 8.
Method # 2: Using the “ls” Command
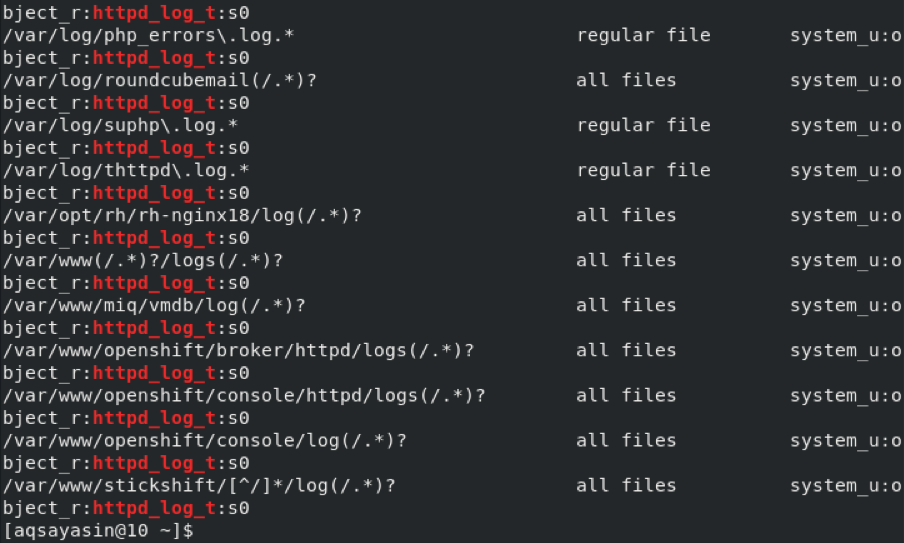
To obtain all the SELinux file contexts in CentOS 8, you can also the following command in your CentOS 8 terminal:
The SELinux file contexts are stored in the “root” directory. To access this directory, you must have root user privileges. In other words, you must run this command along with the “sudo” keyword, just as we did.
![]()
After executing this command, you can view all the SELinux file contexts in your CentOS 8 terminal, as shown in the image below:

Method # 3: Using the “ps” Command
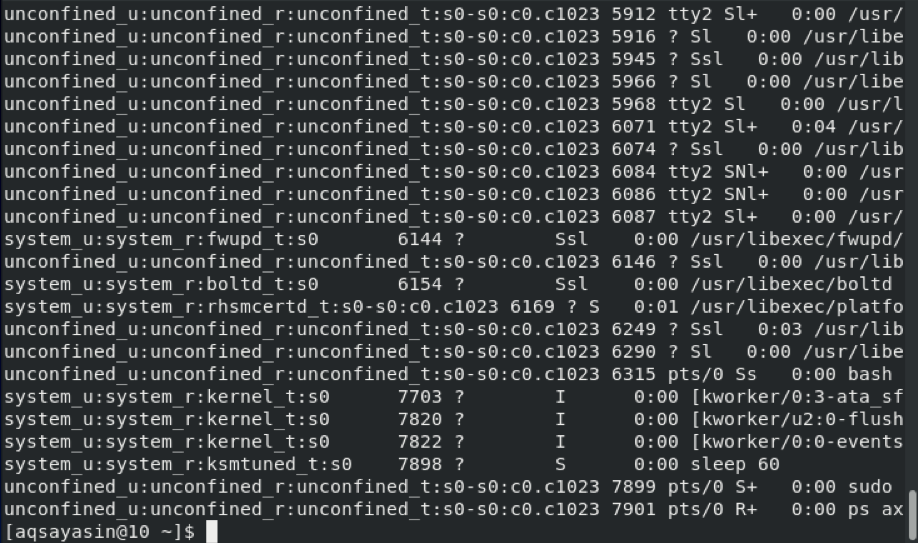
We listed all the SELinux file contexts in the method shown above. At times, you might only need to list all the SELinux process contexts in CentOS 8. You can obtain these contexts only by running the following command in the terminal:
You must have root user privileges to execute the command stated above. In other words, you must run this command along with the “sudo” keyword, just as we did.
![]()
After executing this command, you can view all the SELinux process contexts in the terminal, as shown below:
Method # 4: Using the “id” Command
At other times, you might only need to obtain SELinux current user contexts in CentOS 8. You can list all the SELinux current user contexts by running the following command in your CentOS 8 terminal:
![]()
After executing this command, you can view all the SELinux current user contexts in the terminal, as shown in the image below. This is all the information associated with your current user in the CentOS 8 system.

Conclusion
In this article, first, we shared with you a method for listing all the SELinux contexts at once. Then, we shared with you methods for listing all the SELinux files, processes, and user contexts separately. This puts you in a very good position to play around with SELinux contexts. If you want to see all the contexts of the SELinux processes and files at once, then make use of Method 1. However, if this is not the case, then you can choose Method 2, Method 3, or Method 4 according to your requirements.