The “tree” command is a very extensively used Bash command in Linux. It is used to display the contents of any desired directory of your computer system in the form of a tree structure. By using this tree structure, you can easily find out the paths of your files and directories, check their access permissions, and view the hidden files and directories. Therefore, today we will be talking about using the Bash “tree” command in Linux Mint 20 by sharing some examples with you.
Bash Tree Command in Linux Mint 20:
To use the Bash “tree” command in Linux Mint 20, you first need to install it by running this command:
![]()
It would be nice if you can update your system before running this command. Once the “tree” command is successfully installed on your Linux Mint 20 system, you will get the following messages on your terminal:

Now to check whether the Bash “tree” command is actually residing there on your Linux Mint 20 system or not, you can check its version by running the command stated below:
![]()
The version of the Bash “tree” command that we have managed to install just now is highlighted in the following image:

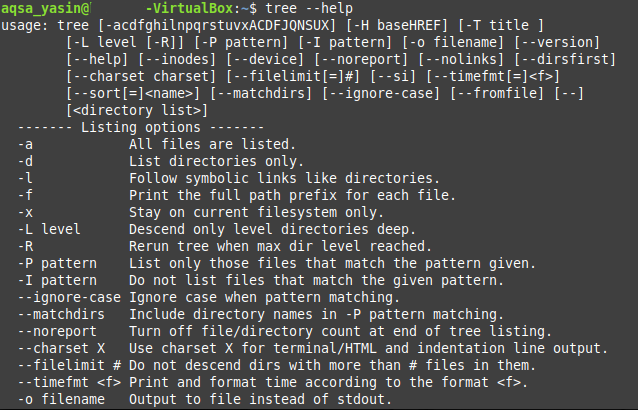
After doing this, you can check out the syntax and all the available options for this command so that you can use it effectively. You can look for this information by running the command stated below:
![]()
Executing this command will display all the necessary information regarding the Bash “tree” command, including its syntax that you will need to work with this command without any difficulty. You can spend some time on it to grasp all the available options nicely.
After performing these steps, we would like to share with you some of the most useful examples of using the Bash “tree” command in Linux Mint 20.
Example # 1: Display the contents of a Directory in a Tree-like Structure:
The tree structures are generally easier to visualize and interpret as compared with the regular textual representation. Therefore, if you have a directory that contains lots of different files and sub-directories in it, then you should prefer to view its contents in a tree-like structure. This can easily be done by running the tree command, as shown below:
![]()
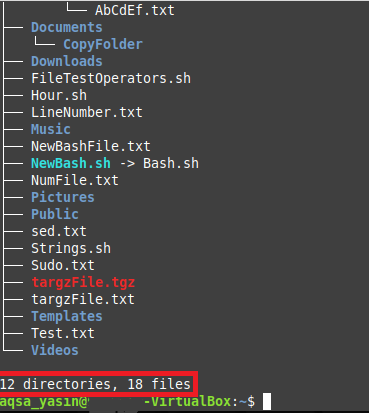
The tree structure of our current working directory is shown in the following image. A point to be noted over here is that the simple “tree” command does not display the hidden files and directories. That is why the number of files and directories displayed in the output of this command is very little.
Example # 2: Display the Hidden Files and Directories with the Tree Command:
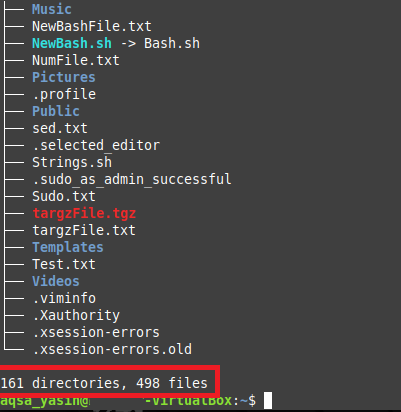
Unlike the simple “tree”, you may also want to have a look at the hidden files and directories. You can do this simply by running the “tree” command with the “-a” flag in the manner shown below:
![]()
You can compare the output of this command with the output shown in example # 1, and you will be able to realize that the number of files and directories is far greater than the one shown above. It is so because this time, the “tree” command has also displayed the hidden files and directories.
Example # 3: Display the Files and Directories along with their Complete Paths:
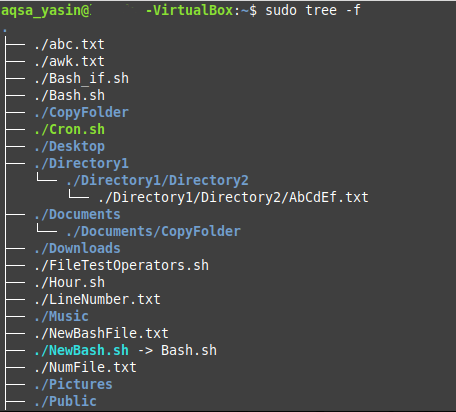
Instead of only displaying the names of the files and directories, you may also wish to find out their exact paths. You can do this simply by combining the “tree” command with the “-f” flag in the following manner:
![]()
The paths of all the files and directories within our current working directory are shown below in the form of a tree structure. If you would have been running the “tree” command in a directory other than the “Home” directory, then the concept of paths would be clearer. However, in our case, since we ran the “tree” command while staying within the “Home” directory, that is why you can only see “./” instead of file or directory path since it represents the “Home” directory.
Example # 4: Print the Directory Tree in XML Representation:
XML or Extensible Markup Language has a specific syntax in which it represents our files and directories. Therefore, if you wish to print your directory tree in an XML representation, then you can do this by pairing the “-X” flag with the “tree” command in the following manner:
![]()
The XML representation of our directory tree is shown in the image below:

Example # 5: Display the Files and Directories along with their Access Permissions:
File and directory permissions are considered very important, especially if we wish to deal with the access control policies within an operating system. If you want the file and directory permissions to be displayed in your directory tree, then you will have to run the “tree” command with the “-p” flag.
![]()
The “read”, “write”, and “execute” permissions are shown before each file and directory name in our directory structure as shown in the following image. Moreover, the directory permissions also include a “d” flag that indicates that the following name is of a directory and not of a file.

Conclusion:
In today’s article, we shared with you the method of installing the Bash “tree” command on your Linux Mint 20 system. We demonstrated the method of verifying its installation and also accessing its help pages. Then we shared with you the five most important scenarios in which the “tree” command can be used very effectively. Apart from these five scenarios, there are lots of other use cases of the Bash “tree” command too. In a nutshell, this Bash command is considered extremely helpful while dealing with the Linux based operating systems.