Suppose there is a main thread A, whose job is to calculate the sum of the variables w and y where w=x+1, and y=z+2. The values of the variables x and z are to be fetched by the user. In this scenario, we can create two threads, B and C. The job of thread B will be to take the value of the variable x from the user, increment it by 1, and save it in the variable w. The job of thread C will be to take the value of the variable z from the user, increment it by 2, and then save it in variable y. Finally, both of these threads will handover these results to the main thread A, which will then calculate their sum and display the final result.
If we would not have created any threads in this scenario, then all the tasks would have been performed by the main thread A in a much larger time. In this way, threads can efficiently perform your calculations without any unnecessary delays. However, there is a very major concern with the usage of threads, which is known as the “race condition”. It is a situation in which two threads try to access and modify the very same data, hence leaving it inconsistent. As a programmer, our goal should be to avoid race conditions in the most graceful manner.
The most commonly employed solution for avoiding race conditions is the use of Mutex. Mutex stands for mutual exclusion, and it basically provides us with a locking mechanism that prevents the access and modification of the critical data by more than one user at a time. In this way, data consistency is ensured. Posix is basically a library that presents us with different built-in functions that make the implementation of threads and Mutex much easier. With the following example, we will try to learn the usage of Posix Mutex with C programming in Linux Mint 20.
Example of Using Posix Mutex with C Programming in Linux Mint 20
We will perform the following three steps for walking you through the usage of Posix Mutex with C programming in Linux Mint 20.
Step #1: Creating a Program Demonstrating the Usage of Posix Mutex with C Programming in Linux Mint 20
First of all, we will create a .cpp file on our Linux Mint 20 system. We will simply go to our Home folder, create an empty document, and name it Mutex.cpp. Once our .cpp file is created, we will open it with the text editor. After that, we will type the code shown in the images below to our .cpp file:
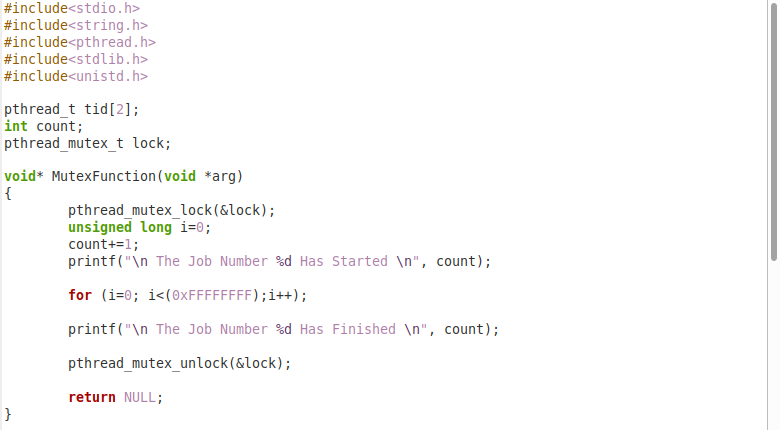
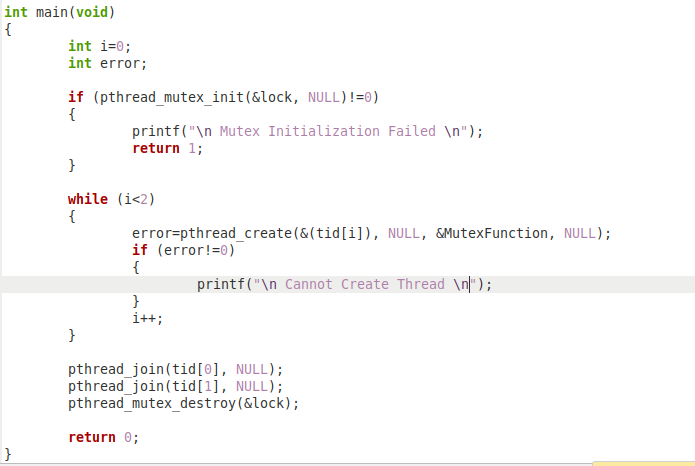
The code shown in the two images above created two different threads. The first thread corresponds to Job #1, whereas the second thread corresponds to Job #2. Then we have created a sample function named “Mutex Function”. In this function, we are first locking the Mutex lock variable, and it will only be unlocked once thread #1 finishes Job #1. Similarly, the Mutex lock variable will again be locked by thread #2 until it finishes Job #2. This “Mutex Function” is called by the “main” function.
Step #2: Compiling the C Program in Linux Mint 20
After saving the .cpp file, we will now compile it through the Linux Mint 20 terminal with the following command:
![]()
Here, “Mutex”, after the “-o” flag, refers to the name of the object file that will be created, whereas “Mutex.cpp” is the name of the original .cpp file. The “-pthread” flag is necessary to compile this program because this program is written while using the “pthread” library. If you omit this flag, your program will not be compiled and will render some errors. The successful compilation of our .cpp file will not produce any messages on the terminal, as shown in the image below:
![]()
Step #3: Running the C Program in Linux Mint 20
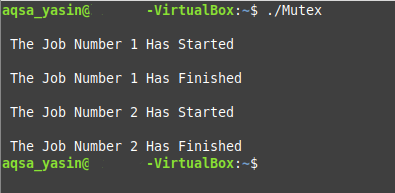
Once the object file named “Mutex” has been created, we can run it using the following command:
![]()
In the output of our Mutex.cpp program, you will notice that first Job 1 has started, which means that thread #1 has acquired the Mutex lock. After that, Job 1 finishes after some time. Then, Job 2 starts, which means that thread #2 has acquired the Mutex lock. It will only be unlocked once Job 2 finish.
Conclusion
This article provided an in-depth explanation of the usage of Posix Mutex with C programming in Linux Mint 20. The Mutex can be used very effectively to avoid the race conditions while programming by simply including the Posix or pthread library in our C code. This will not only ensure data consistency but will also make the processing much more efficient.
The best thing about using the Posix library in Linux is that we do not even need to install any specialized software, packages, or compiler for it. The C code can simply be written in any default text editor on Linux and can be compiled and run with the default gcc or g++ compilers. This proves to be an added layer of ease and convenience in the usage of Posix Mutex with C programming in Linux Mint 20.