Method of Installing PHP MyAdmin on Ubuntu 20.04:
For installing PHP MyAdmin on Ubuntu 20.04, you will need to perform the following steps:
1. The first thing that you need to do is to launch the terminal in Ubuntu 20.04. After that, it is strongly recommended to update your system so that it can smoothly install all the latest packages and programs. For doing that, you will need to type the following command in your terminal and then press the Enter key:
This command will take a little while to execute. It is shown in the image below:
![]()
2. As soon as this command executes successfully, your Ubuntu 20.04 system will be all set to install PHP MyAdmin. Another recommendation in this regard is to install all the relevant extensions along with PHP MyAdmin. For doing that, type the following command in your terminal and then press the Enter key:
This command is also shown in the following image:

3. During the execution of this command, you will be asked for your consent regarding this installation. Type in “Y” and then press the Enter key to continue as highlighted in the image shown below:

4. After that, you will be asked to select your desired web server. It is advisable to select apache2 and then press the Enter key to proceed as highlighted in the following image:

5. Then you will be asked if you want to set up your database with dbconfig-common or not. Press Enter to give your consent, as shown in the image below:

6. Then you will be asked to set up a password for accessing PHP MyAdmin. Type in a password of your choice as shown in the following image and then press the Enter key to continue:

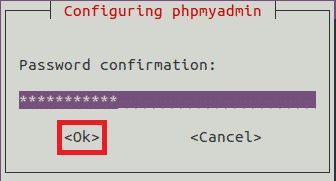
7. After that, you will be asked to reconfirm your password, as shown in the image below:
8. However, if you have previously set up a password while installing MySQL on your system, then the above step will generate an error message. You will need to press the Enter key to continue, as shown in the following image:
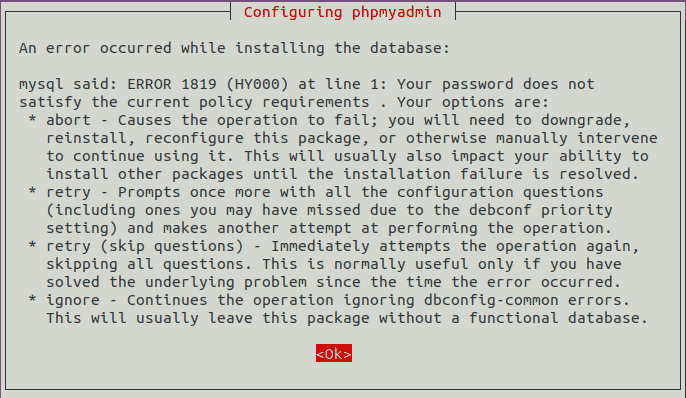
9. Now select the Abort option from the list and press the Enter key to stop the installation process for a while, as highlighted in the image shown below:

10. As soon as the installation process is aborted, type the following command in your terminal and then press the Enter key:
This command is also shown in the following image:
![]()
11. Running this command will open up MySQL on your terminal, i.e., an interface where you can run SQL queries. Now type the following command in that interface and then press the Enter key:
Running this command will disable your MySQL password, which you can re-enable later on. This command is shown in the image below:
![]()
12. After running this command, type “exit” and press the Enter key to exit the MySQL interface as shown in the following image:
![]()
13. Now type the following command in your terminal and then press the Enter key to resume the PHP MyAdmin installation:
This command is also shown in the image below:
![]()
14. Once the installation process is completed, you can re-enable your MySQL password by opening MySQL and then typing the following command and pressing the Enter key:
Running this command will re-activate your previously set MySQL password. It is shown in the following image:
![]()
15. After that, you can exit from your MySQL interface. Now you need to install the mbstring extension for PHP MyAdmin explicitly. For doing that, type the following command in your terminal and then press the Enter key:
This command is also shown in the image below:
![]()
16. Finally, you will need to restart your apache2 web server to complete the installation of PHP MyAdmin on your Ubuntu 20.04. For doing that, type the following command in your terminal and then press the Enter key:
This command is shown in the following image:
![]()
Conclusion:
By following the steps described in this article, you can easily install PHP MyAdmin on Ubuntu 20.04 and hence make it all the more convenient for yourself to interact with your databases.